")
Do you need help to organize your Gmail inbox? Sometimes our overwhelmingly crowded inbox can be a cause of stress or make us miss important emails! If you’re running a small business or just have a busy life, it’s really helpful to have an organized inbox.
Here, I’ll show you how to create labels, apply them to your existing emails, and filter all future emails in Gmail.
This article is for Gmail. If you use a different email service like Outlook, check out our other articles specific for those. (Outlook on the Web and Outlook PC)
Gmail uses labels instead of folders. This is a useful tool because you can apply many labels to the same email, unlike a folder where you can only put the email into one. Labels allow you to be super specific and organized!
There are 3 steps to organizing your inbox with Gmail.
I’ll walk you through each step.
CREATE A LABEL
Gmail offers 3 ways to create a label.
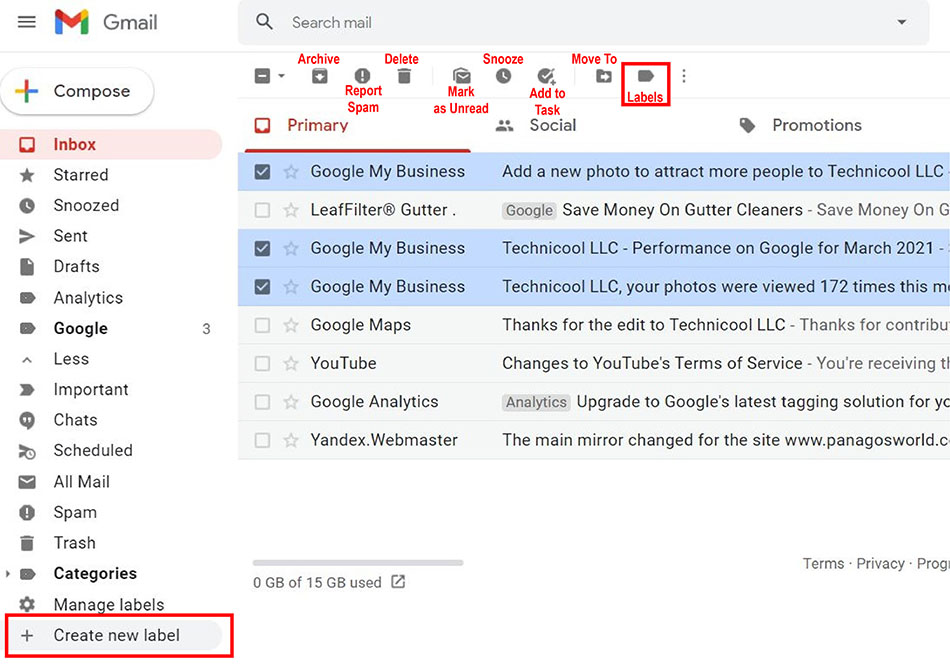
The first way is through selecting an email / multiple emails.
- Select an email or multiple emails, then at the top in the same bar with the “archive, mark as spam, and delete” buttons, you’ll see a
 Click that and create your new label!
This will automatically apply the label to those selected emails. The other 2 ways do not do this since there are no emails selected to sort.
The second way is through the side bar
- Scroll down in that menu and at the very bottom you will see “+ Create new label”
If you do not see it at first, you can click on v More on the side menu and it will show you all the options.
On the graphic below, we already clicked on More to show you the entire sidebar. - Click that and create your label!
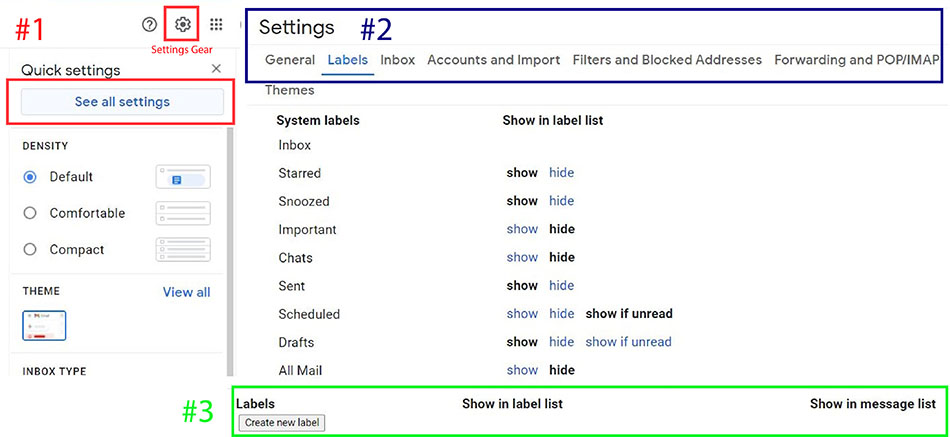
The last way is through the settings. Here you can also manage all of your other labels.
- Click the gear at the top right (settings) and click “see all settings”
- Then, click the 2nd tab called “labels” and scroll all the way down. Here you will see a list of all the already existing labels. You can manage these labels (rename, delete, etc.) and also create new ones
- Click “create new label” which is right under the title “label” and create a new label.
APPLY
To apply a label, select an email or multiple emails, click ![]() , select the label you want, and then click apply!
, select the label you want, and then click apply!
MOVE
A separate tip that’s not vital to organization but does clear up a lot of room is moving the emails from your inbox to those labels. This won’t delete your emails, only move them so that you can declutter your main inbox. To move emails,
- Select an email or multiple emails and click
 .
. - Select which label you want to move it to. By clicking on the label, it will move is right away without having to click an “apply” button.
This will remove the email from your inbox and it will only show up in its assigned label. By moving the email, it will automatically label it in whichever label you assigned it.
TIP: The difference between Moving and Labeling an email is that labeling simply makes it available in 2 or more places depending on how many labels you assign: your inbox and the labels you assign.
Moving an email will remove it from your inbox and assign it to the label you moved it to.
This means that it can only be found in that label and not the inbox.
FILTERs
Lastly, you can filter all future emails to automatically be labeled. There are two ways to create a filter.
First Way
- To create a filter, click the
 down arrow next to the search bar.
 - Enter all the info you want to filter.
Example: From: johndoe@gmail.com… this will filter every email that comes from that email. Subject: coupon… This will filter everything that has the word “coupon” in the subject line and so on. - Click “create filter”
- Select “Apply the label: _______” and choose which label you want to apply.
- Also, click the last box “Also apply filter to __ matching conversation”.
- Then click “create filter”
This will then apply the label to whatever future emails contain the criteria you specified earlier. This will not affect any of the already existing emails in your inbox.
Second way
The second way is to open up an email that you are wishing to created a filter for.
In the top right corner, click on the 3 dots and select “Filter Message Like This”
This will take you to Step 2 mentioned above but will have automatically filled in the email address in the From section of the form.
Source: https://support.google.com/a/users/answer/9260550?hl=en


0 Comments